There are three kinds of markers on the waveform.
Figure 1
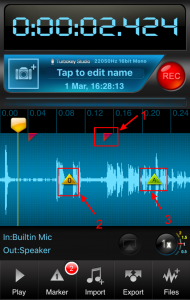
1. Edit marker (Figure 1.1)
The red edit marker will be shown to indicate that edit operation had been done on that place.
The edit operation can be done by users manually(cut or paste)
The edit operation can also be done by the app automatically.
For example, when the app is recording, an incoming call will stop the recording. And when the incoming call ended, the app will start a new recording file automatically. So when users stop recording, Recorder Plus will add two files in the same recording session. then an edit marker will be shown.
2. Marker (Figure 1.2)
The yellow markers are added by users to mark the position where they are interested in.
They can be added when recording is going on by tapping on the waveform.
They can also be added when users edit the recording by tapping on the waveform then selecting the “Mark” in the shown menu.
3. Auto marker (Figure 1.3)
Reference this article for more detail information:
How to make silence-free recording?
3.When the app is recording, and a phone call is incoming, then the recording will be paused, after the phone call is over, the app will resume recording. then an “A” marker will be added.