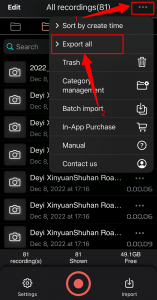
To export all recordings, two options are available:
In Recorder Plus, tap “…” (Figure 1.1), then select “Export All”. (Figure 1.2)
1. iTunes Sync
Now all recordings will mix down.
Figure 1
When the mix down process end, connect iPhone/iPad to PC/Mac with USB wire, then reference Apple’s article to copy files of Recorder Plus from iPhone/iPad to PC/Mac:
Use iTunes to share files between your computer and your iOS or iPadOS device
2. WiFi
When your iPhone is in a WiFi network, tap this option will show a URL like: http://192.168.***.***
Input this url in a browser(chrome, IE, Edge..) On your PC which is in the same WiFi network. Then you can download all recordings one by one.
After you finished downloading the recordings, tap the “close connection” button on your iPhone to stop exporting.